Learn basic drop-down menus that you can do within Shopify to build more complex ones later.
1. How to organize menu items in Shopify admin?
Step 1: In your Shopify admin, go to Content > Menus.
Step 2: Under the Menus section, click on the title of the menu you want to edit or click “Create menu” to build a new one from scratch.

Step 3: Set up the menu item
- Click on Add menu item
- Enter the menu item’s name
- Assign a link to that menu item, it might be a specific page, collection, product, or external URL.
Step 4: Set up the nested menu item
- One more time, click on the Add menu item.
- Hold the icon and drag the new menu item under the existing one. (Be aware of the blue line to know where your menu item will go)

Step 5: Click Save.
💡 What are Menu items and Nested menu items?
 |
2. How to display your drop-down menus on the store
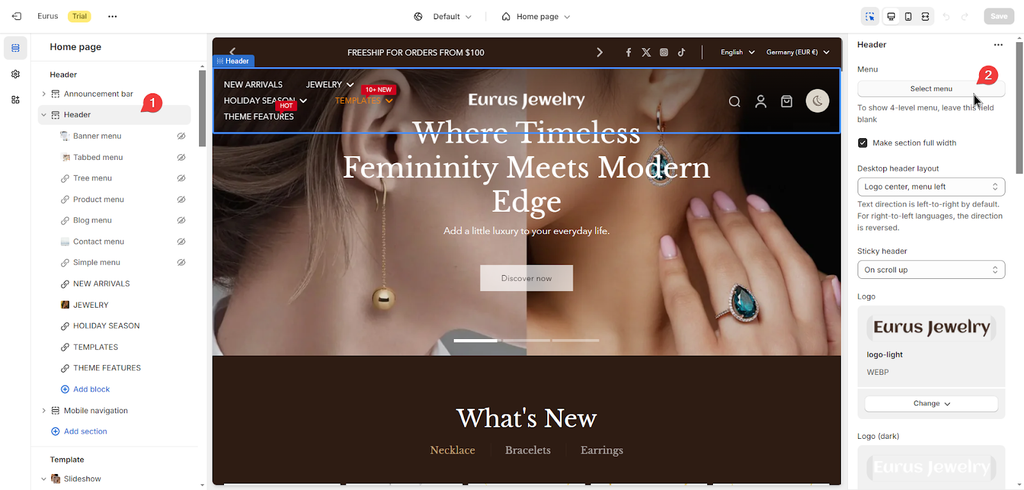
Step 1: From your Shopify admin panel, go to Online Store > Themes > Click on Customize to open the Theme Editor.
Step 2: In the Theme Editor, on the left sidebar, under Header, click on the Header section.
Step 3: A new panel will appear. By default, Eurus assigns the Main menu for the header.
If you want to change this menu, click the Change button to open the drop-down list, from here, you can continue to:
- Select Change menu → Choose the menu you want → Click Select.

- Select Remove menu → Click on the Select menu button → Choose the menu you want → Click Select.

Step 4: Click Save.
|
✨ If you wish to display 4-level menus or add additional elements such as images or banners to your menu, you should continue reading the next part about How to create mega menus? |
