1. What is a promotion grid?
A promotion grid is a section that displays promotions using images or videos along with short descriptions and optional labels. Unlike product grids, promotion grids don't directly show products; instead, they provide links to specific products or collections. They're useful for highlighting special offers and drawing attention to specific promotions or products.

2. How to set up the media?
To set up the media with the given settings: Click on the "Add promotion" button to add a new promotion block.
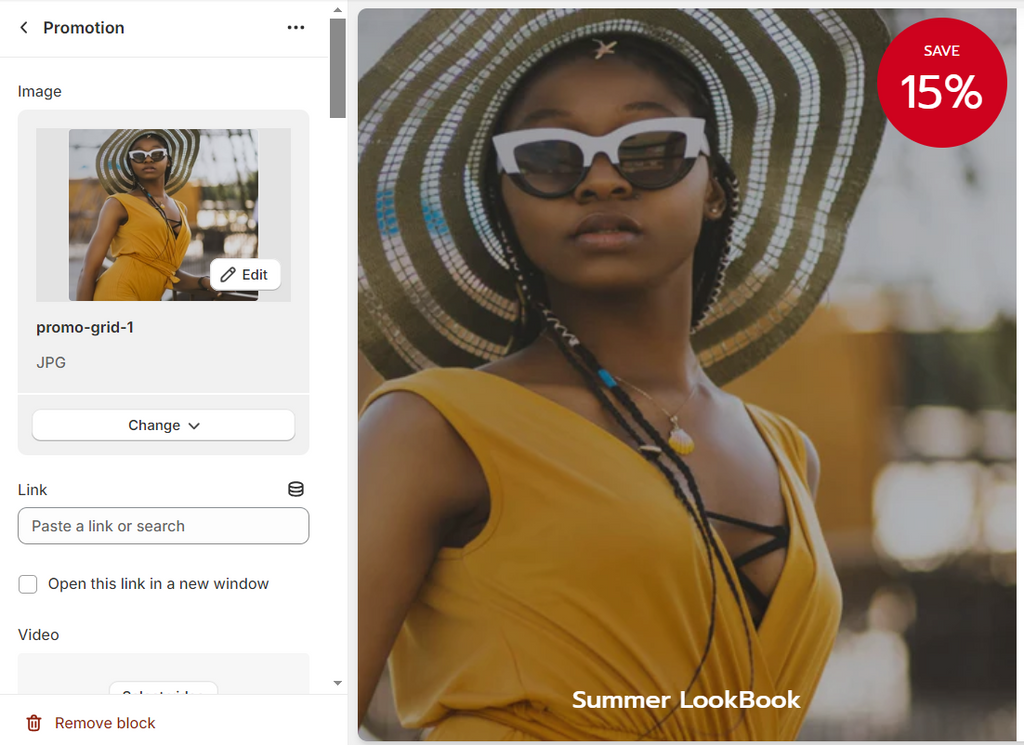
a) Image:
- Click the "Select image" button to choose an image from your library or free image resources.
- After selecting the image, you can click "Change" to replace it with another image.
- Set the overlay opacity by adjusting the slider. A higher value will make the image darker.
- Enter the URL where users will be redirected when they click the image.
b) Video:
- If you choose to add a video, click the "Select video" button to choose a video from your store's data.
- Enter the URL of the video in the "Embed Video From URL" field. Only YouTube and Vimeo videos are supported.
- Tick the checkbox next to "Enable video autoplay" if you want the video to play automatically.
- Locate the “Show sound control” checkbox. Check the box to enable the sound control feature. By default, this checkbox is set to false. Once enabled, an icon will appear on the storefront, allowing customers to toggle sound on or off as needed.

- Enter alt text for the video in the "Video alt text" field.
Once you've configured all the settings according to your preferences, you can save the changes and the media block will be set up accordingly.

3. How to modify the height and width of each media block?
a) Section settings:
- Adjust the number of columns displayed on desktop devices.
- Set the spacing between blocks within the section.
- Define the height of each row of media within the section.
- (Optional) Enable "Keep block ratio on different screen width" to maintain the block's aspect ratio across screen sizes, but disables the Row height setting.
- For mobile layout, the settings are similar to desktop layout, but the number of columns is limited to 1-2 columns.
b) Promotion block
- Adjust the number of columns wide by selecting a value between 1 and 6. This determines the width of the media block. Please note that: The number of columns here cannot exceed the number of columns configured in the section settings above.
- Adjust the number of rows tall by selecting a value between 1 and 6. This determines the height of the media block.

- Enter the title of the media block in the provided field.
- Adjust the size of the title by selecting a percentage value between 50% and 200%.
- Enter the content of the media block in the provided text field.

- Choose the alignment of the content (Left, Center, Right) using the provided options.
- If you want to include a button on the media block, enter the label of the button in the "Button label" field.
- Enter the link where users will be redirected if they click on the button in the "Button link" field.


4. How to show content outside of the media?
To display content outside of the media, you can use the Overlay feature in the media block settings.
If you want the content to appear in the image, enable the content overlay option and adjust the overlay opacity (ranging from 0% to 100% - the higher the value, the darker the image is) and overlay content position settings accordingly.

If you prefer the content to be outside the image, simply disable the “Enable the content overlay” settings.


5. How to add a sale label to the promotions?
Sales labels can be added to promotions to highlight campaigns.To execute this function, navigate to the Sale label settings group within each individual promotion. Here, users can input up to three lines of text and apply various styling configurations:
- Enter the content for each line of the sale label in the respective fields (Line 1, Line 2, Line 3). This could include promotional messages like "SALE", "50% OFF", or any other relevant information.
- Adjbetween 50% and 200% in the corresponding "Line X font size" fields. ust the font size for each line of the sale label by selecting a percentage value
- Choose the position of the sale label from the available options: Top left, Top right, Bottom left, Bottom right.
- Choose the style of the sale label from the available options: Square, Circle, Flag, Angle. Select the background color of the sale label by choosing a color from the available options.
- Choose the text color of the sale label by selecting a color from the available options.
Example: Circle

Example: Flag

6. How to create a Swipeable promotion grid on mobile?
If you have more than three images in your promotion grid section, a swipeable carousel can be a better way for customers to view them on mobile devices.
To enable this feature:
- In Theme Editor, click on the Promotion grid section.
- Scroll down to the Mobile layout setting.
- Check the box that says Enable swipe on mobile.
- (Optional) Turn on "Enable next/previous arrow on mobile" to show the arrows so customers can click to see the next blocks instead of scrolling through them on mobile.
- Click "Save".

7. How to add and display products on the section?
STEP 1: Add the Product block
Under Promotion grid section, add the Product block.
STEP 2: Set up the block
Click on the block to open its settings panel:
- Choose a Product to display on the section.
- (Optional) Show vendor, product rating,..
- Choose the layout of the block.
STEP 3: (Optional) Show customized product image with metafield
✍️ Why would you need to use metafield for product images?
- You want to show a designed image for the product on the section, without changing the featured images of that product.
- You want to show higher-resolution images.
Then follow this:
3.1: Create a product metafield:
- In Shopify admin, go to Settings> Metafields and metaobjects > Products > Add definition.
- Give your metafield a Name.
- Choose type as Image (File).
- Click Save.
3.2: Assign a value for the product metafield:
- Go back to Shopify admin, click on the Products, and then find the product (that is chosen in STEP 2) to assign the metafield value.
- Scroll down to Product metafields.
- Upload an image in the newly created product metafield.
- Click Save.
👉 Refer to this guidance about “How to create Product metafields” for a detailed explanation.
3.3: Set up in Theme editor:
- Back to Promotion grid section > Product block.
- Copy the text after “custom.” of the metafield’s Namespace and key. → Paste to this “Auto-fill product images with metafield” field.
- Click Save.
STEP 4: Save your changes
8. How to add and display collections on the section?
STEP 1: Add the Collection block
Under Promotion grid section, add the Collection block.
STEP 2: Set up the block
Click on the block to open its settings panel:
- Choose a Collection to display on the section.
- Adjust text size, title size or choose custom image.
- Choose the layout of the block.
STEP 3: (Optional) Show customized collection image with metafield
✍️ Why would you need to use metafield for collection images?
- You want to show a designed image for the collection on the section, without changing the featured images of that collection.
- You want to show higher-resolution images.
Then follow this:
3.1: Create a collection metafield:
- In Shopify admin, go to Settings> Metafields and metaobjects > Collections > Add definition.
- Give your metafield a Name.
- Choose type as Image (File).
- Click Save.
3.2: Assign a value for the collectionmetafield:
- Go back to Shopify admin, click on the Products > Collection tab.
- Find the collection (that is chosen in STEP 2) to assign the metafield value.
- Scroll down to Collection metafields.
- Upload an image in the newly created collection metafield.
- Click Save.
👉 Refer to this guidance about “How to create Product metafields” for a detailed explanation.
3.3: Set up in Theme editor:
- Back to Promotion grid section > Collection block.
- Copy the text after “custom.” of the metafield’s Namespace and key. → Paste to this “Auto-fill collection images with metafield” field.
- Click Save.
STEP 4: Save your changes

