1. What is a blog post?
A blog post is an individual article or entry published on a blog page. It is a platform for sharing information, ideas, opinions, news, or any content relevant to the blog's theme or purpose. Blog posts typically include text, images, and links to provide valuable and engaging content for readers.

2. How to set up a blog post page?
To set up a blog post page, follow these steps to configure various content blocks and settings:
- Enable this option “Show comment counts” to display the number of comments on the blog post.
- Adjust the padding at the top and bottom of the section to ensure proper spacing. This can range from 0 to 100 pixels.
Featured Image and Breadcrumbs blocks
Include a featured image and breadcrumbs to enhance navigation and visual appeal:
- Display the featured image for your blog post by adding the block. Set up this block for both desktop and mobile layouts, adjust the image height, and tick the option to make the banner full width on desktop.
- Display breadcrumbs for easier navigation by adding this block. Note that this block does not have customizable settings; its purpose is solely for arranging the layout.
Title block and Metadata
Configure the title and display metadata such as the author and date:
- Set and style the title of the blog post to ensure it is prominently displayed.
- Select the heading tag for this section to enhance the SEO of the page.
- Enable “Show Author” to display the author’s name.
- Enable option “Show Date” to display the publication date of the blog post.

Content block
- Add and manage the main content block where your blog post’s text and media are displayed
Back to blog block
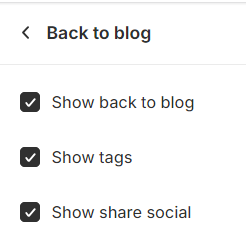
Configure the "Back to blog" block to allow users to navigate back to the main blog page.
- Enable the option "Show back to blog" to display the "Back to blog" button.
- Enable the option "Show tags" to display the tags associated with the blog post.
- Enable the option "Show share social" to display social sharing buttons, allowing readers to share your post on social media platforms.

3. How to add a Side Bar to the blog post page?
✍️ Why might you need a side bar?
A side bar can enhance your blog post page in several ways:
- Increases engagement: It offers additional content, calls-to-action, or promotions without distracting from the main content.
- Improves navigation: It provides quick links to other relevant content, making it easier for readers to find what they're looking for.
- Boosts conversions: It provides extra space for promoting products or services related to the blog post's topic.
✍️ Steps to Add a Sidebar:
Step 1: Go to Blog post page:
In your Shopify theme editor, click on the drop-down menu and select "Blog posts."
Step 2: Add a “Side bar” section:
Click the "+" button to add a new section. Name it "Side bar."
Step 3: Customize the overall sidebar look
Before adding content, you can adjust the overall appearance of the sidebar. Click on the sidebar section to open the customization panel, where you can:
- Change the Sidebar Position: Choose to display the sidebar on the left or right of the blog post.
- Enable Sticky Sidebar: Tick the "Enable sticky sidebar" option to keep the sidebar fixed as users scroll.
- Set up RTL Language: Adjust the sidebar layout for right-to-left languages.
- Choose Edge Style: Select between square or rounded corners for all blocks within the sidebar.
Step 4: Customize the side bar content
By default, the side bar will contain a text block and a promotion banner block:
- Highlight text: Add a simple title and description for the side bar.
- Promotion banner: Create a banner with a text overlay to promote a product or service.
You can add two more blocks:
- Product Block: Link directly to a product or a list of up to 10 products related to the blog post. You can select them or connect metafields to personalize the product list for each blog post.
- Social Sharing Block: Add buttons for quick sharing on social platforms like Facebook, X (formerly Twitter), Pinterest, and more.
By following these steps, you can easily add a side bar to your blog post pages and enhance the overall user experience.
4. How to add a table of contents to the blog posts?
Add a Table of Contents to make your blog posts easier to navigate and improve reader experience. Here’s how:
Step 1:
In Theme Editor, navigate to the blog post page.
Step 2:
In the left panel, click on the "Blog Post" section.
Step 3:
In the settings panel, tick the box Enable table of contents.
Step 4: Customize Settings:
- Table of Contents title: Edit the title for your Table of Contents if desired.
- Table position on desktop: Choose its position to be Left or Right for the desktop. (On mobile, the table of contents is always on top)
- Open this tab by default: Check this to have the Table of Contents open initially.
- Sticky table of contents: Toggle to make it sticky when scrolling.
- List style: Select Ordered (Number list) or Unordered (Bullet list).
- Enable social icons: Tick it to display them.
|
⚠️ Important: Use heading tags (H1, H2, etc.) for each section in your blog post to ensure the Table of Contents displays correctly.
|


