Pages & Templates
Pages & Templates
Pages & Templates
1. What is a Password page? A password page is used to restrict online visitors from accessing your store. Here are some ways to use it: Building Anticipation: Tease a new collection or a major website redesign. Exclusive Access: Reward loyal customers with a sneak peek. Test Drive: Get feedback from a select group before going live. Work in Progress: Create a stylish "coming soon" page while building your dream store. 2. How to set up the Password? a) Add/edit your store password Step 1: In your Shopify admin, go to Online Store > Preferences Step 2: Go to the Password Protection section. Step 3: Check Restrict access to visitors with the password. Step 4: Enter your chosen password (don't use your admin password!). Add a message for visitors if you'd like. Step 5: Click Save. b) Remove the password from your store Step 1: In your Shopify admin, go to Online Store > Preferences Step 2: Go to the Password Protection section. Step 3: Uncheck Restrict access to visitors with the password. Step 4: Click Save. 3. How to set up the Password Page template? You can always edit the content and appearance of your Password Page with these simple steps: Step 1: In your Shopify admin, go to Online Store > Theme Step 2: On the theme you want to edit, click Customize. Step 3: From the dropdown menu, type in Password to navigate to the Password page template. Step 4: From here, you can freely edit the layout & content of the page by adding new sections & blocks. Step 5: Click Save If you still have more questions about the Password Page, contact us.
Pages & Templates
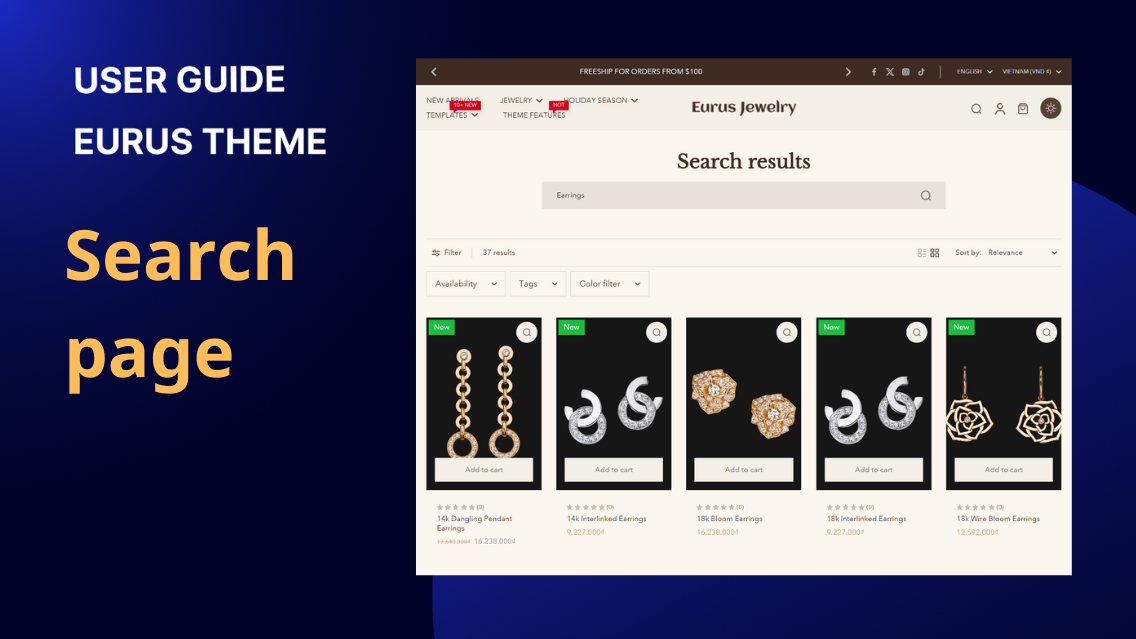
1. What is a Search page? The search page is the page that displays the search bar and relevant results after a customer uses your store's search function. It allows your customers to easily find specific products, collections, or information on your website. 2. How to set up the Search page? a) How to customize the Search page layout? Step 1: In your Shopify admin, go to Online Store > Theme Step 2: On the theme you want to edit, click Customize. Step 3: Navigate to the Search page by choosing Search from the dropdown menu. Step 4: Customize how your Search page looks by: Click on the Search results section & make adjustments. (for more detailed instructions, continue reading the below guidance) Add new sections & new blocks inside the section. Step 5: Click Save. b) How to enable the Filters tool? To add filters to your collection and search results pages, you need to install an app from the Shopify App Store. If you: Use the Shopify Search & Discovery app (recommended). Follow the guidelines here. Use a different app, please check its documentation for instructions. c) How to change the Desktop Filter layout? Step 1: In your Theme Editor, go to the Search page (As guided above), and click on the Search results section under Template. Step 2: In the new panel that appears, under Desktop Filter Layout, Eurus has 3 cool styles to choose from! You can freely “pick a new outfit” for your filters! Style 1: DRAWER Style 2: ASIDE Style 3: ABOVE Step 3: (optional) Check the box Expand all filters by default to always show all the filter options without your customers having to click anything. 📍 Note: This setting only applies to the Drawer and Aside filter layout. Step 4: Once you’re happy with your result, click Save d) How to customize the look of Product Cards on the search page? Go to Theme Editor > Search page > Search results section under Template. In the new panel that appears, under the Product card, you can customize them to show exactly the information you want: e) How to customize the look of Blog cards on the search page? Go to Theme Editor > Search page > Search results section under Template. In the new panel that appears, under the Blog card, control your blog's search results with a few clicks f) How to set up the Pagination? 📌 How to choose type of pagination: Go to Theme Editor > Search page > Search results section under Template. In the new panel that appears, under the Pagination setting, you have 3 options to choose from: Pagination (Default): This is the normal way to see products. Customers can click on numbers to go to different pages. Infinite scroll: This is like a never-ending page. When you scroll to the bottom, more products will appear automatically. Click to load: You'll see a button that says "Load more." Click it to see more products. Which one should you choose? Infinite scroll is good if you want to show lots of products quickly, without requiring your customers to do any more actions. Click to load is good if you want to control how many products your customers see at a time. And let them control. Pagination (Default) is always a good choice if you're not sure. 📌 How to change the Pagination style? Go to Theme Editor > Search page > Search results section under Template. In the new panel that appears, under the Pagination, choose one among 2 styles: Circle and Underline.
Pages & Templates
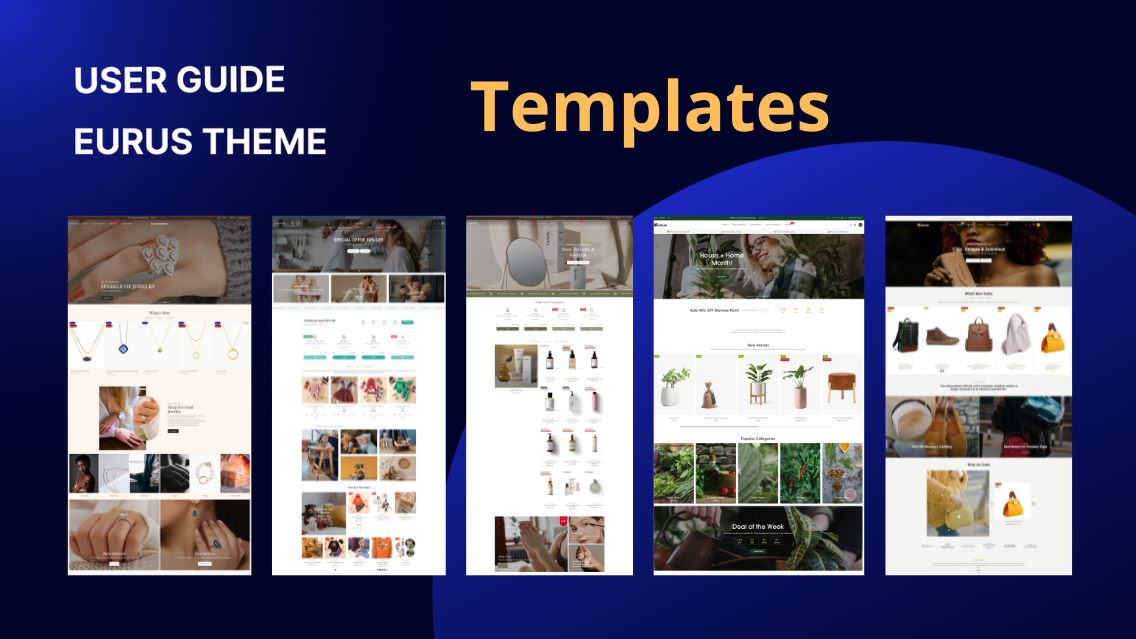
1. What is a template? Templates are pre-designed layouts that help you quickly build and customize different types of pages on your website. They provide a consistent look and feel across your site, saving you time and effort. 2. How to create a new template? For detailed steps on creating templates, refer to this document. 3. Find your perfect Eurus Theme Templates No need to start from scratch! The Eurus theme comes packed with a variety of pre-built templates. These templates are designed to cater to different needs and styles, ensuring you find the perfect fit for your site, and allowing you to create a professional-looking store. Whether you're in fashion, electronics, home goods, or any industry, Eurus has you covered. With dedicated home, product, collection, and static page templates for each sector, you can quickly set up your store while still enjoying a wide range of layouts and industry-specific sections. 4. How to use pre-built templates? a) Find & edit the template you want Step 1: In the Theme Editor, open the drop-down menu, start typing the page name, and select it to open. Example: Find a landing page template by typing "Landing" and choosing the one you want. Step 2: Edit your page template as you want. Step 3: Click Save when done. b) Assign it to make it appear on your site Step 1: From your Shopify admin, go to Online Store> Pages Step 2: Click Add page to create a new page: Enter the Title for your page Make sure to set Visibility to Visible Step 3: At the bottom right, find the Theme template section, then select your template from the drop-down list. 📍 Note: Only templates from the Live theme (the current active theme for your store) will appear in the drop-down list. Ensure your desired theme is set as the Live theme to access its templates. Step 4: Click Save.

Pages & Templates
1. What are Static Pages? Static pages are the unchanging parts of your website that provide essential information, such as policies, about us, FAQs, and contact details. 2. Types of static pages This user guide will cover some of the common types of static pages you can create for your website: Policy page: These detail your shipping, return, and privacy policies. About Us page: This is where you can tell your brand's unique story. FAQ Page: Answer common customer questions in a clear and organized way. Contact Page: Make it easy for customers to reach you. 3. How to change their looks a) How to customize the Policy page layout? Your Shopify store automatically comes with a few pre-made policy pages (like your refund policy or privacy policy). These policy pages: Can’t change the layout: Their layout is fixed and cannot be adjusted in Theme Editor. Can only change the content: Head to Settings > Policies to update the content. ❓ What if I want a custom look for my Policy page? Create a new template for your Policy page. Create a new page named “Policy page” in Online Store > Pages Assign that template to the Policy page. Need a more detailed guidance? Check it out here. b) How to customize the About Us/ FAQ/ Contact page You can customize the appearance of these three types of static pages using the same methods. Here are two ways to change how they look in your store: Option 1: Edit the existing template: Head to the Theme Editor Open the drop-down menu, and type in “About”. Eurus Theme provides many About Us page templates for you to choose Edit your page template & click Save 📍 Note: Don't forget to make your new template visible in your store! Go to Online Store > Pages to assign it. For step-by-step instructions, please see our detailed guide. Option 2: Create a new page: The same steps apply! Just one thing different: instead of choosing an existing template, scroll down in the drop-down menu and click "Create template" to make a new one.
Pages & Templates
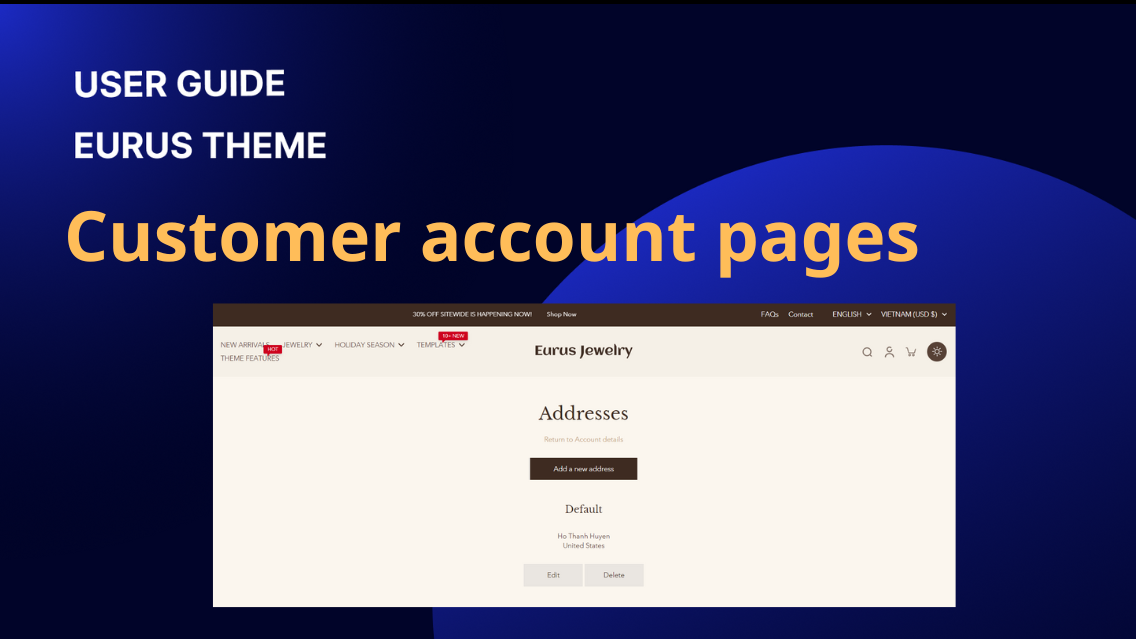
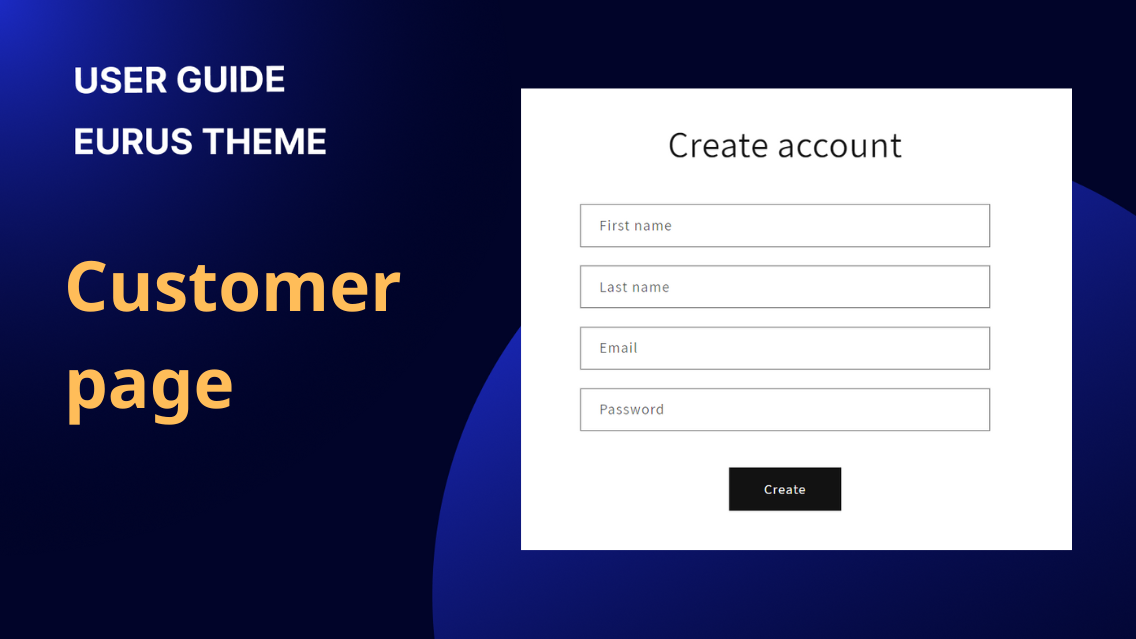
1. Customer register The customer registration page allows new users to create an account by filling out a form with their personal details. This form includes fields for first name, last name, email, and password, along with a "Create" button to submit the information. Note: This page is only applicable for stores using classic customer accounts. For more details, please refer to the Shopify guide: Shopify Classic Customer Accounts. You can configure the top and bottom padding for both desktop and mobile layouts by editing the padding values to ensure proper spacing and layout consistency. 2. Customer activate account Customer activate account page appears when a customer accesses the site from an account confirmation email, requiring them to confirm their account. Please note the logic of this page: When a customer account is disabled, the admin sends an invitation email to the customer. The customer will follow the link in the email to access this page. You can configure the top and bottom padding for both desktop and mobile layouts 3. Customer login & Customer reset password These pages allow customers to log into their account or reset their password if they've forgotten it. To access these pages in the theme editor, navigate to the "Customer login" and "Customer reset password" pages. Customer Login Page: Customers can enter their email and password to log in. Provides an option to navigate to the password reset page if they have forgotten their password or wanted to change their current password. Customer Reset Password Page: Customers can request a password reset by entering their email address. They will receive an email with instructions to reset their password. You can adjust the top and bottom padding for both desktop and mobile layouts to ensure proper spacing and layout consistency. 4. Customer account The Customer Account page is where customers can store and manage their personal information and view their order history. This feature provides a centralized location for customers to keep track of their past orders and manage their account details. Key Features: Personal Information: Customers can view and update their personal details, such as name, email, and password. Order History: A table displaying the customer's order history, including details such as order number, date, status, and total amount. By default, the order history table displays up to 20 orders per page. You can configure pagination style for navigating through the order history. This allows customers to easily browse through their past orders. 5. Customer order The Customer Order page stores information about a customer's order history. From this page, customers can access detailed order information, reorder items, and manage their purchases efficiently. Key Features: Order History: Displays a list of all past orders with basic information such as order number, date, status, and total amount. Reorder Option: Provides an easy way for customers to reorder items from their past orders with a single click. You can adjust the padding settings for the Customer Order page to control the spacing around the content. 6. Customer addresses The Customer Addresses page allows customers to manage their shipping and billing addresses within their account. This feature enhances the user experience by providing a centralized location for customers to update and manage their address information. Key Features: Add New Address: Customers can add multiple addresses for shipping and billing purposes. Edit Address: Existing addresses can be updated to reflect new information. Delete Address: Customers can remove addresses they no longer use. To access the Customer Addresses page, customers need to: Log into their account. Navigate to the "Account" section. Select "Addresses" from the account menu.
Pages & Templates
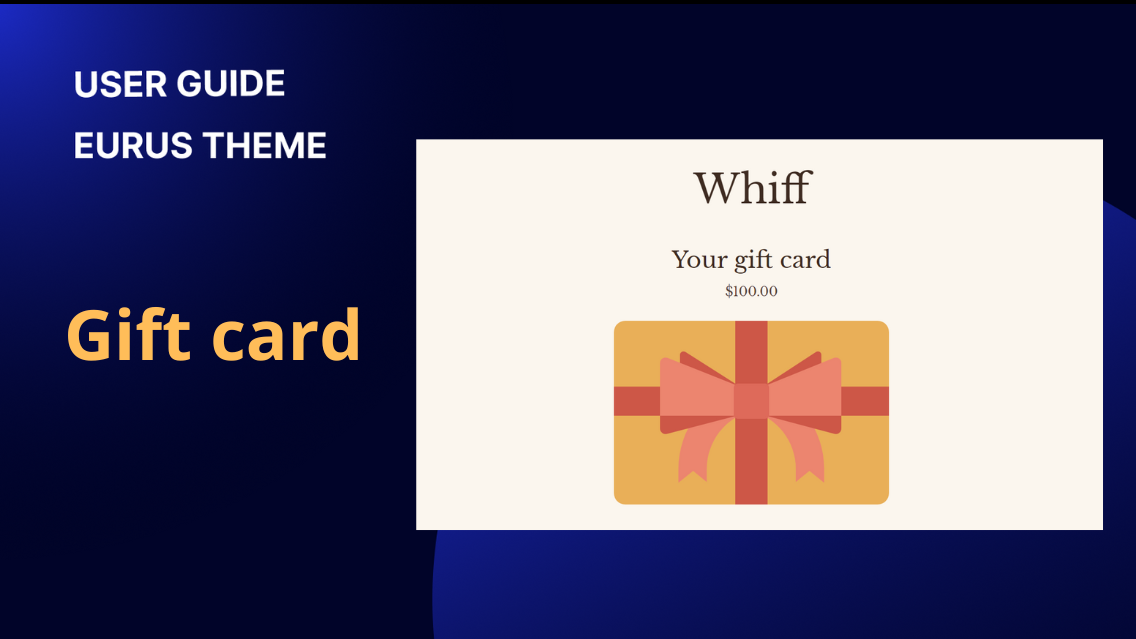
Gift Card Page is automatically generated to display information about a gift card, including the card's value, unique code, and expiration date. The primary purpose of this page is to provide the recipient with all necessary details to use their gift card. You can only modify the header of this page. Upload an image to serve as the logo on the gift card page. Adjust the width of the logo for desktop devices to ensure it fits well within the header and maintains visual appeal. Adjust the width of the logo for mobile devices to ensure it remains clear and properly scaled on smaller screens. Additionally, this page will display gift card information such as the code and valid date, pulled from the details provided when the gift card is created.
Pages & Templates
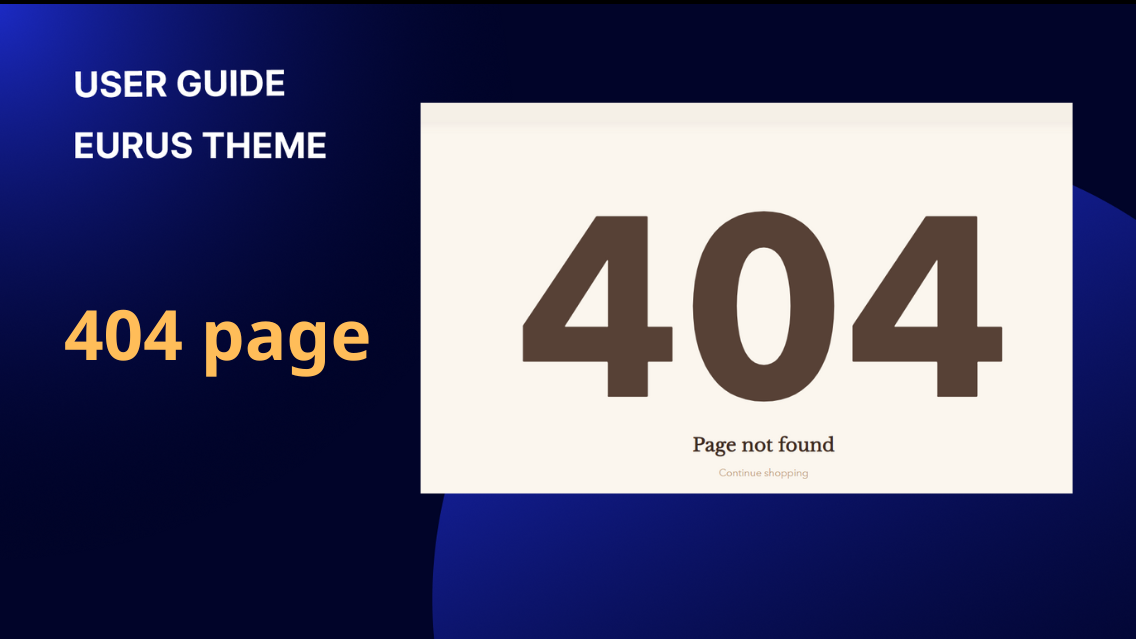
The 404 page appears when a user tries to access a page that does not exist on your website. It serves to inform users that the page they are looking for cannot be found and can provide guidance on what to do next. You can configure the 404 Page by following these steps: Upload an image for the 404 page or explore free images. Set the heading for the 404 page. Adjust the size of the heading. Add custom text to provide further information or instructions for the user.
Pages & Templates
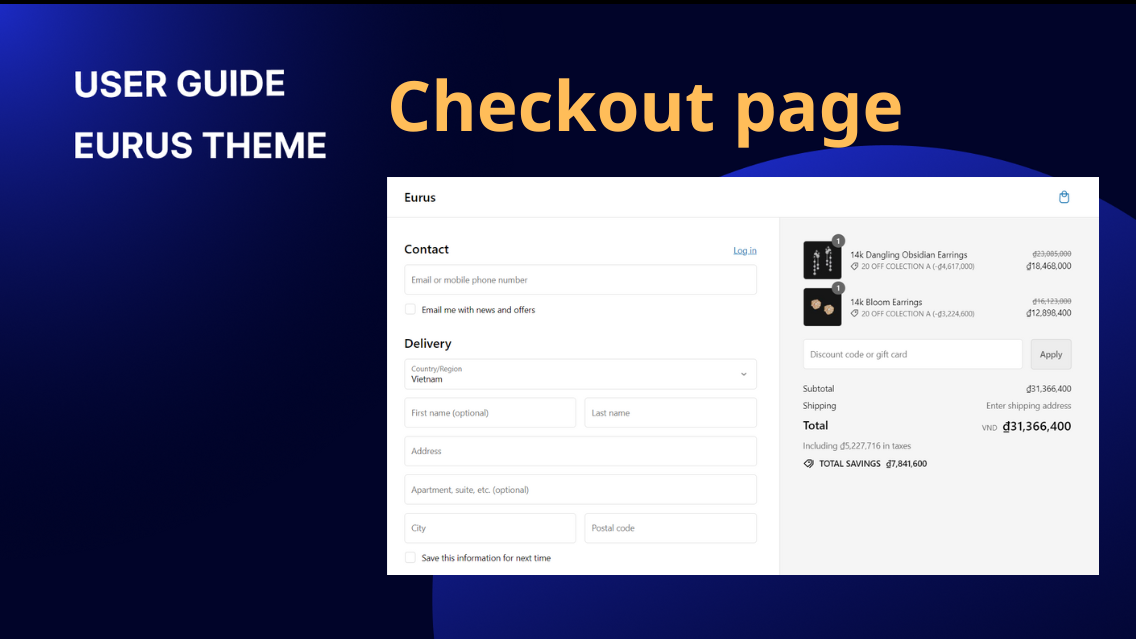
The checkout page is the final step in your customer's journey, where they turn their cart into an order. How to customize your checkout page? While Shopify has some restrictions on direct checkout customizations, you can still personalize the experience: Step 1: Go to Settings > Checkout in your Shopify admin. Step 2: In the Configuration section, click Customize. You will be navigated to the Theme Editor to edit the Checkout page. For more detailed instructions, check out the Shopify Help Center.
Pages & Templates
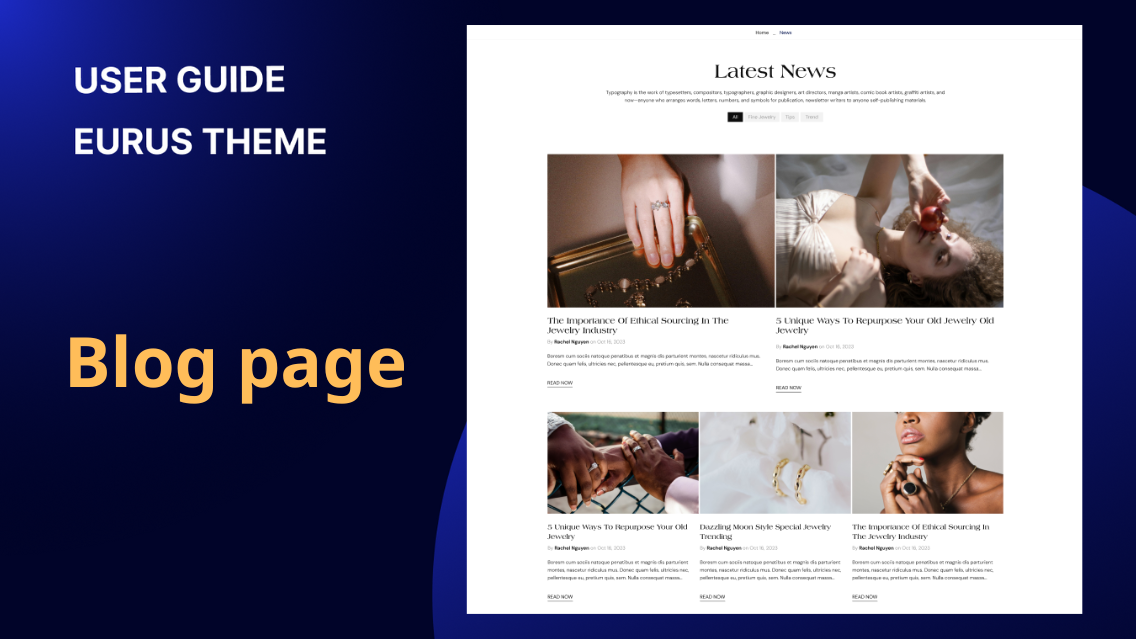
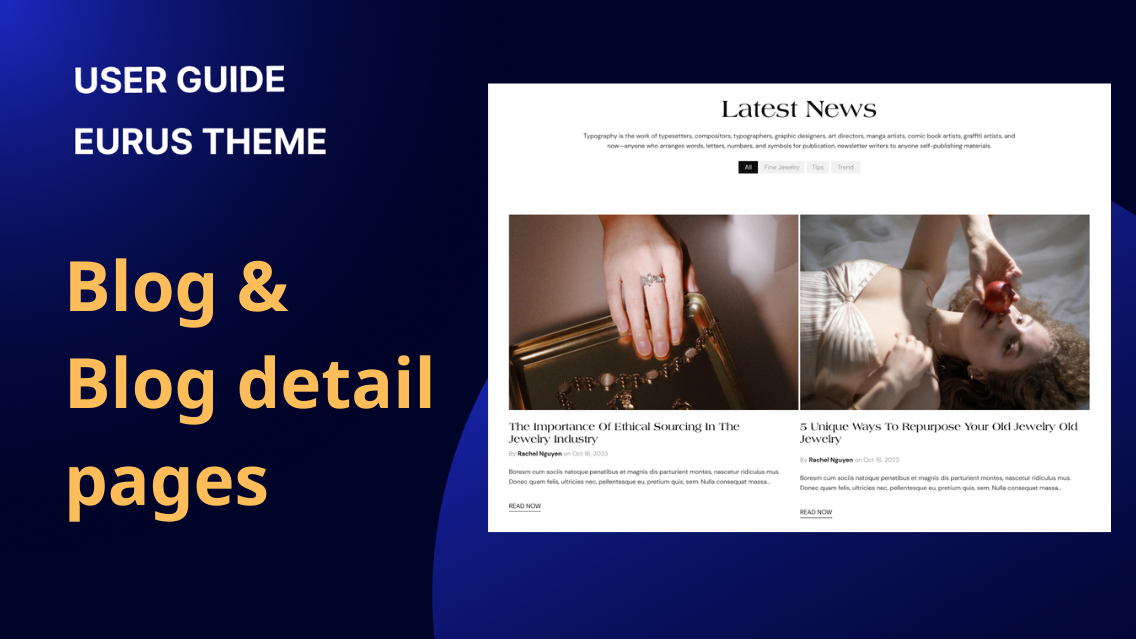
1. What is a blog page? The Blog Page is a crucial part of a website that serves as a content hub, engagement tool, and SEO booster. It helps in building brand authority, connecting with customers, and driving traffic to the site. By regularly publishing valuable content, it enhances the overall user experience and strengthens the relationship between the brand and its audience. 2. How to set up a blog page? To set up a blog page, follow these grouped configuration steps: Select the heading tag for this section to enhance the SEO of the page. Tick the checkbox "Show all blog tags" to display all tags available in the blog, or untick it to hide them. When tick the checkbox: When untick the checkbox: Adjust the general layout settings by specifying the number of posts per page and setting the number of columns for desktop display. Tips: To highlight the first row, you can set up "Number of columns on first row" differently to other rows. This configuration works like "Number of columns on desktop" but only applies to the first row of the blog post list. By default, it is set to match the "Number of columns on desktop" setting. (Only applies on desktop screens) For mobile devices, choose between different layout options like placing the image on top or to the left. Enhance the appearance of blog posts by enabling featured images and setting the desired image ratio. Display additional information such as the author’s name, the publication date, excerpts, tags, and comment counts. . For posts without featured images, you can opt to display a secondary background. Adjust the padding for the top and bottom of the blog section to create appropriate spacing around the content. 3. How to add a top banner to the Blog page? To include a banner image for the blog page, create a blog metafield: In your store backend, go to Settings > Custom data > Metafields > Blogs. Click Add definition, and fill in the necessary information: Name: "Featured image" Namespace and Key: "custom.image" (Please note that the key needs to be exactly like this.) Description: (optional) describe the purpose. Choose File, then One file, and set rules to accept only images. In each blog post's settings, select an image under Metafield > Featured image to be the banner. The banner will be shown at the top of each blog page, based on the image file added in the metafield. In the Theme editor > Blog page > Blog page section > Image banner: you can choose whether you want the banner to be full width on each device or not by configuring the settings "Make banner full width on desktop" and "Make banner full width on mobile". 4. How to set up the pagination on the Blog page? a) How to choose pagination: In Theme Editor, open the Search page, click on the section Blog page, find the Pagination setting. You have 3 options to choose from: Pagination (Default): This is the normal way to see products. Customers can click on numbers to go to different pages. Infinite scroll: This is like a never-ending page. When you scroll to the bottom, more products will appear automatically. Click to load: You'll see a button that says "Load more." Click it to see more products. Which one should you choose? Infinite scroll is good if you want to show lots of products quickly, without requiring your customers to do any more actions. Click to load is good if you want to control how many products your customers see at a time. And let them control. Pagination (Default) is always a good choice if you're not sure. b) How to change the pagination indicator style: In Theme Editor, open the Search page, click on the section Blog page, find the Pagination type setting, you can choose between 2 options: 1️⃣ Circle: 2️⃣Underline: These steps ensure a well-structured and visually appealing blog page that enhances the user experience and displays content effectively.
Pages & Templates
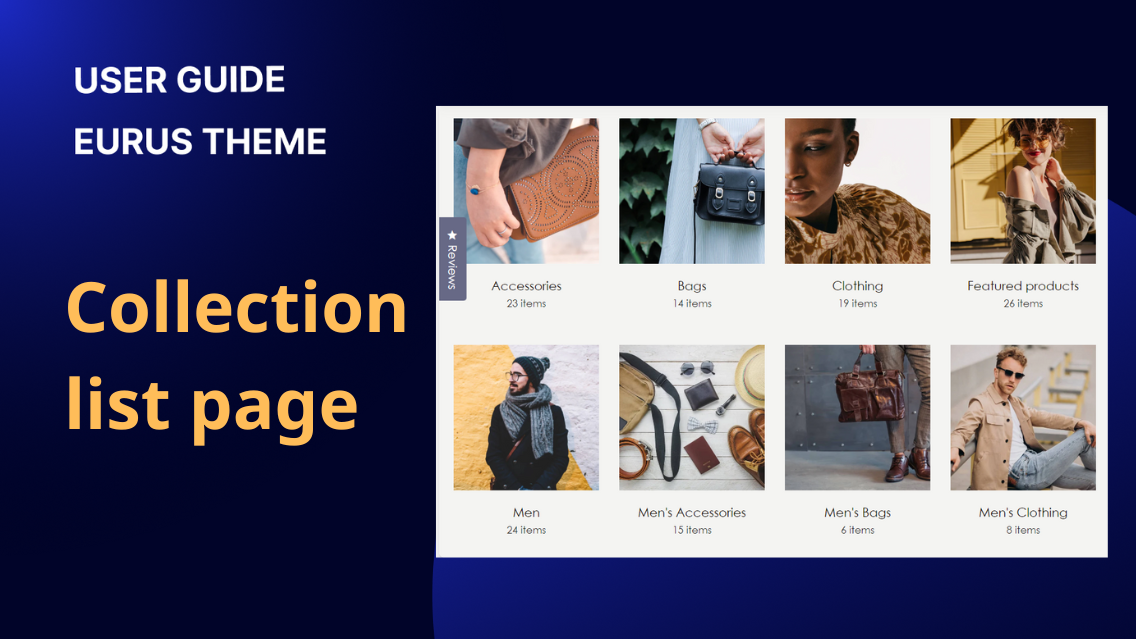
1. What is a collection list page? A Collection List Page is a type of page that displays all active collections or specifically chosen collections. It serves as a central hub where customers can browse through various collections of products offered by the store. 2. How to add a heading at the top of my collection list page? Step 1: Open the Collection list page in Theme Editor. Step 2: Under Template, click “Add section” to add a new Collection banner section Step 3: On the new panel that appears on the right side, make changes to the following sections to customize your Heading: Section Function Enter the content to add a heading for the collection list page Slide left/right or enter the specific number to the box to change the font size of your heading Change the text alignment of your heading Select the tag of your heading (for SEO purposes) Step 4: Click Save to save your changes. 3. How to add a banner at the top of my collection list page? Step 1: Open the Collection list page in Theme Editor. Step 2: Under Template, click “Add section” to add a new Collection banner section Step 3: On the new panel that appears on the right side, make changes to the following settings: Section Function Add the image that you want to make the banner If you want to add a heading text above your image, this will place a layer over your background image. So, your heading will be easier to read. Slide right or left to adjust the opacity of the overlay Change the DESKTOP layout for the banner Adjust the background image height Make the whole banner full-width Adjust top padding Adjust bottom padding Change the MOBILE layout for the banner Adjust the background image height Make the whole banner full-width Adjust top padding Adjust bottom padding Step 4: Click Save to save your changes. 4. How to add breadcrumbs to my collection list page? Step 1: Open the Collection list page in Theme Editor. Step 2: Under Template, below the Collection banner, select “Add breadcrumbs” Step 3: Change the setting to make the breadcrumbs appear the way you want. Step 4: Click “Save” 5. How to set up the collection list page? To set up the collection list page, follow these grouped configuration steps: Enter the heading for this page Set the heading tag (e.g., H1) for the page title. Collections By default, all active collections are displayed on this page. To show selected collections, you need to configure "Show collections" to "Selected" and add a block for each collection. In case you choose to show only selected collections, follow these steps: Go to the section settings of your collection list page, configure "Show collections" to "Selected" Add a block for each selected collection. Choose the specific collection you want to display. Upload or select images for the collection if the collection itself does not have a featured image. Set the number of columns/rows the collection spans (e.g., 1). Sort collections alphabetically or by other options (Only applied when all collections are shown) Collection Card Choose the image style to display among [style], [style 2] and [style 3]... To add an image to the collection on this page, edit it from the admin. Adjust the title size (e.g., 80%). Enable Text Overlay Choose content alignment (Left, Center, Right) & Choose content position (Top, Center, Bottom). Adjust the overlay opacity (e.g., 5%). Color Settings: Set the title & text color for dark/light backgrounds. Layout Set the number of columns on the desktop/mobile (e.g., 5). Adjust spacing between blocks (e.g., 28 px). Set top/bottom padding (e.g., 36 px). By following these steps and configurations, you can effectively set up and customize your collection list page to display all or selected collections, enhancing user navigation and engagement on your site. 6. How to display only specific collections on a page? Step 1: Open the Collection list page in Theme Editor. Step 2: Select the Collection list page section. Step 3: On the new panel popup, under Show Collections, click on “Selected”. Step 4: Add a new Collection block and change the setting to: Assign a collection to the block Add a cover image for the collection Change the width and height of the collection. The final look! 7. How to change the sort order of the collections? There are two main ways to change the order of collections displayed on your collection list page: a) Method 1: Automatic Sorting (All Collections): This automatic sorting can only apply if you're showing All collections: Click on the Collection list page section, under Sort collections by, and choose the way you want your collection to be displayed: b) Method 2: Manual Sorting (Selected Collections): You can only give your collection list a custom order if you choose to show only Selected collections. Following the guide on How to display only specific collections on a page After choosing all the collections you want to appear on your collection list page, hold and drag the Collection block into your desired order. 8. Show customized collection images with metafield ✍️ Why would you need to use metafield for collection images? You want to show a designed image for the collection on the menu, without changing the featured images of that collection. You want to show higher-resolution images on the menu. ✍️ How to do it? Step 1: Create a collection metafield: In Shopify admin, go to Settings> Custom data > Collection > Add definition. Give your metafield a name. Choose type as File. Click Save. Step 2: Assign a value for the collection metafield: Go back to Shopify admin, and click on the Products > Collection tab. Choose a collection. Scroll down to Metafields. Upload an image in the newly created collection metafield. Click Save. 👉 Refer to this guidance about “How to create Product metafields” for a detailed explanation. Step 3: Set up in Theme Editor: In Theme Editor (Visit it by clicking on Online store > Themes > Customize) Click on the Collection list page (from the dropdown menu on top) Tap on the Collection list section. A new panel will appear, scroll down to find Auto-fill collection images with metafield. Copy the text after “custom.” of the metafield’s Namespace and key. → Paste to this “Auto-fill collection images with metafield” field. (See the image below) Click Save. 9. How to customize the look of my collection cards? All customizations for your collection cards can be made directly in your theme editor. Here's how: Step 1: Go to your Shopify admin, navigate to Online Store > Themes, and click Customize next to your active theme. Step 2: In the theme editor dropdown menu, within Template, find and select the Collection list page. Step 3: On the new panel shown, locate the section called Collection card. This is where you'll make all your changes. 🔍 To change the aspect ratio of your collection card… Choose your favorite Image style option 🔍 To change the title size of your collection card… Slide left or right, or enter a specific number to the Title size 🔍To make the title shown on your collection card… Click the box to Enable Text overlay You can also adjust the transparency of the overlay using the Overlay opacity setting 🔍 To change the title alignment of your collection card… Select your preferred Content Alignment. 🔍To change the title position on your collection card… Select your preferred Content position: Note: This is only applicable when the Text overlay setting is enabled.
Pages & Templates
All customer account pages have no sections or settings needed to customize. Customer login page Customer register page Customer reset password page Customer account page Customer order page Customer addresses page
Pages & Templates
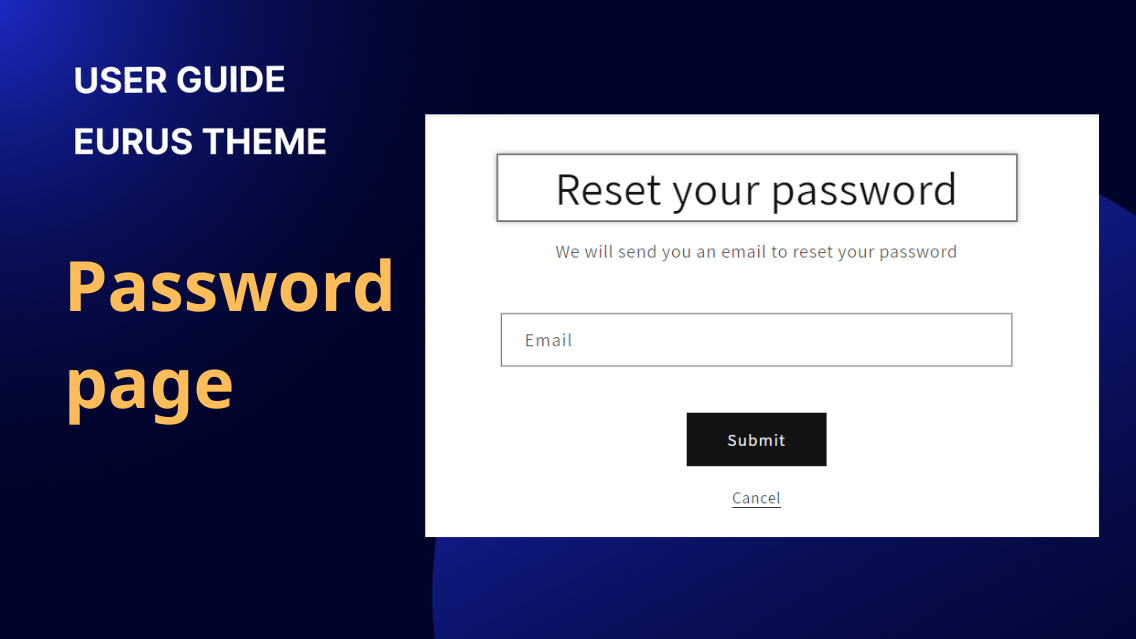
Password page is a Shopify page using a password is a Shopify store webpage requiring visitors to enter a password before accessing its content. This page contains 2 sections : Password header : You can exchange the store name by uploading or selecting your store's logo Password page: You can customize this section to show newsletter signup form or social links.
Pages & Templates
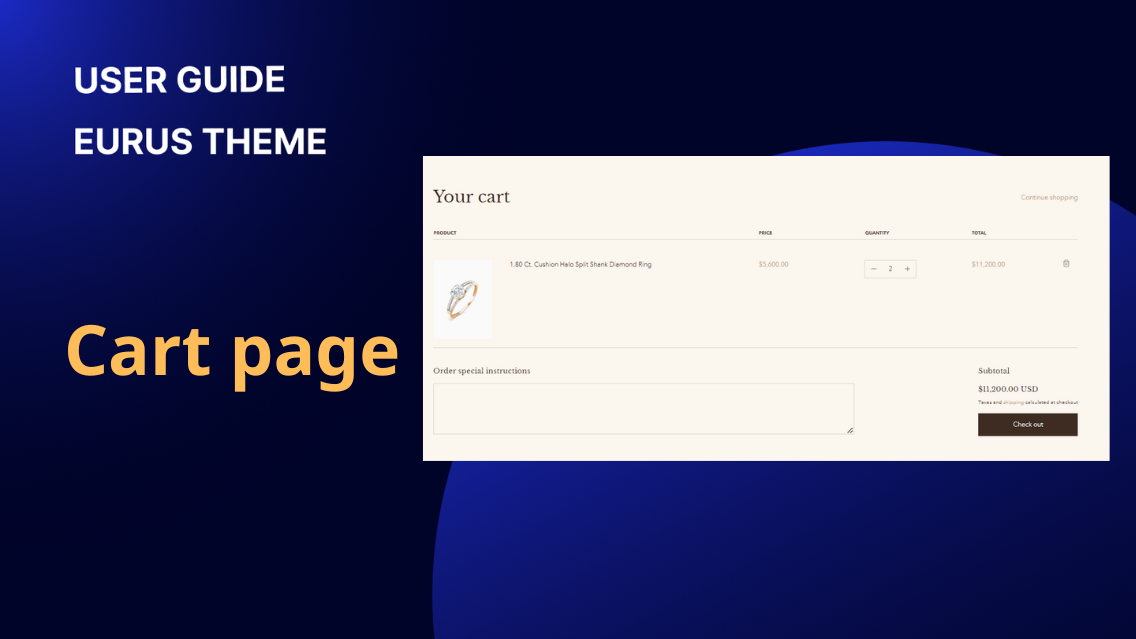
1. What is Cart Page? Shopping spree done? Time for the Cart Page reality check. With Eurus Theme, your Cart page is more powerful: Review items in the cart (edit or remove) Add an order note/ instructions View estimated item costs, delivery rates, and taxes View the estimated delivery dates You can freely change the layout of your Cart page by opening the Theme Editor and going to the Cart page. 2. How to set up the cart page template? Before jumping right in, let’s take a look and decide your preferred cart page layout, then you can navigate to the exact spot for guidance. Which one do you prefer? This one… 1-column layout (Above layout) ➜ Go to a) Setting up the 1-column layout: … or this one? 2-column layout (Side layout) ➜ Go to b. Setting up the 2-column layout: Follow our step-by-step instructions to make it happen a) Setting up the 1-column layout: Step 1: In Theme Editor > Theme Setting > Cart > Select your “Cart layout“ to be Above Step 2: In the Section setting, under the “Subtotal“ section, add/remove these blocks to customize your cart page: b) Setting up the 2-column layout: Step 1: In Theme Editor > Theme Setting > Cart > Select your “Cart layout” to be Side Step 2: In the Section setting, under the “Items“ section, add/remove these blocks to customize your cart page: 📌 Note: Depending on your Cart layout choice (Above or Side), you can customize only one section: Subtotal for Above layout Items for Side layout. 3. How to set up the minicart? Minicart provides a sneak peek of what's inside, perfect for a quick glance before checkout. 🛒 In Eurus Theme, your mini cart has its own style, separate from its big brother, the Cart page. To set it up, head to Theme Settings > Cart in your Theme editor. Here's what you can play with: Change your cart type: Twitch how it appears (on the side or popup) Free shipping bar: Show customers how close they are to free shipping. Estimated delivery date: Give them a heads up on when their order will arrive. Cart note/ instructions: Let buyers leave special instructions for their order. Discount code: Enter discount code to estimate total costs
Pages & Templates
Customer account Configure the customer account page. Section padding Top padding Adjust the padding on top of the banner (range from 0 to 100 px). Bottom padding Adjust the padding at the bottom of the banner (range from 0 to 100 px). Customer activate account Configure the customer activate account page. Section padding Top padding Adjust the padding on top of the banner (range from 0 to 100 px). Bottom padding Adjust the padding at the bottom of the banner (range from 0 to 100 px). Customer register Configure the customer register page. Section padding Top padding Adjust the padding on top of the banner (range from 0 to 100 px). Bottom padding Adjust the padding at the bottom of the banner (range from 0 to 100 px). Customer reset password Configure the customer reset password page. Section padding Top padding Adjust the padding on top of the banner (range from 0 to 100 px). Bottom padding Adjust the padding at the bottom of the banner (range from 0 to 100 px). Customer order Configure the customer order page. Section padding Top padding Adjust the padding on top of the banner (range from 0 to 100 px). Bottom padding Adjust the padding at the bottom of the banner (range from 0 to 100 px). Customer addresses Configure the customer addresses page. Section padding Top padding Adjust the padding on top of the banner (range from 0 to 100 px). Bottom padding Adjust the padding at the bottom of the banner (range from 0 to 100 px).
Pages & Templates
1. What is a blog post? A blog post is an individual article or entry published on a blog page. It is a platform for sharing information, ideas, opinions, news, or any content relevant to the blog's theme or purpose. Blog posts typically include text, images, and links to provide valuable and engaging content for readers. 2. How to set up a blog post page? To set up a blog post page, follow these steps to configure various content blocks and settings: Enable this option “Show comment counts” to display the number of comments on the blog post. Adjust the padding at the top and bottom of the section to ensure proper spacing. This can range from 0 to 100 pixels. Featured Image and Breadcrumbs blocks Include a featured image and breadcrumbs to enhance navigation and visual appeal: Display the featured image for your blog post by adding the block. Set up this block for both desktop and mobile layouts, adjust the image height, and tick the option to make the banner full width on desktop. Display breadcrumbs for easier navigation by adding this block. Note that this block does not have customizable settings; its purpose is solely for arranging the layout. Title block and Metadata Configure the title and display metadata such as the author and date: Set and style the title of the blog post to ensure it is prominently displayed. Select the heading tag for this section to enhance the SEO of the page. Enable “Show Author” to display the author’s name. Enable option “Show Date” to display the publication date of the blog post. Content block Add and manage the main content block where your blog post’s text and media are displayed Back to blog block Configure the "Back to blog" block to allow users to navigate back to the main blog page. Enable the option "Show back to blog" to display the "Back to blog" button. Enable the option "Show tags" to display the tags associated with the blog post. Enable the option "Show share social" to display social sharing buttons, allowing readers to share your post on social media platforms. 3. How to add a Side Bar to the blog post page? ✍️ Why might you need a side bar? A side bar can enhance your blog post page in several ways: Increases engagement: It offers additional content, calls-to-action, or promotions without distracting from the main content. Improves navigation: It provides quick links to other relevant content, making it easier for readers to find what they're looking for. Boosts conversions: It provides extra space for promoting products or services related to the blog post's topic. ✍️ Steps to Add a Sidebar: Step 1: Go to Blog post page: In your Shopify theme editor, click on the drop-down menu and select "Blog posts." Step 2: Add a “Side bar” section: Click the "+" button to add a new section. Name it "Side bar." Step 3: Customize the overall sidebar look Before adding content, you can adjust the overall appearance of the sidebar. Click on the sidebar section to open the customization panel, where you can: Change the Sidebar Position: Choose to display the sidebar on the left or right of the blog post. Enable Sticky Sidebar: Tick the "Enable sticky sidebar" option to keep the sidebar fixed as users scroll. Set up RTL Language: Adjust the sidebar layout for right-to-left languages. Choose Edge Style: Select between square or rounded corners for all blocks within the sidebar. Step 4: Customize the side bar content By default, the side bar will contain a text block and a promotion banner block: Highlight text: Add a simple title and description for the side bar. Promotion banner: Create a banner with a text overlay to promote a product or service. You can add two more blocks: Product Block: Link directly to a product or a list of up to 10 products related to the blog post. You can select them or connect metafields to personalize the product list for each blog post. Social Sharing Block: Add buttons for quick sharing on social platforms like Facebook, X (formerly Twitter), Pinterest, and more. By following these steps, you can easily add a side bar to your blog post pages and enhance the overall user experience. 4. How to add a table of contents to the blog posts? Add a Table of Contents to make your blog posts easier to navigate and improve reader experience. Here’s how: Step 1: In Theme Editor, navigate to the blog post page. Step 2: In the left panel, click on the "Blog Post" section. Step 3: In the settings panel, tick the box Enable table of contents. Step 4: Customize Settings: Table of Contents title: Edit the title for your Table of Contents if desired. Table position on desktop: Choose its position to be Left or Right for the desktop. (On mobile, the table of contents is always on top) Open this tab by default: Check this to have the Table of Contents open initially. Sticky table of contents: Toggle to make it sticky when scrolling. List Style: Select Ordered (Number list) or Unordered (Bullet list). Enable social icons: Tick it to display them. Note: Use heading tags (H1, H2, etc.) for each section in your blog post to ensure the Table of Contents displays correctly.

